Showing posts with label photos. Show all posts

Saturday, July 9, 2016

How to Make an Animated Doodle Gif

Hello everyone! How has life been? It's been quite wonderful here these past few days. Summer has brought loads of free time and with that comes slow breakfasts outside, movies with friends, bike rides to the gym with my family, a new recipe for dinner each night... I love it. I know, however, that the school year will come eventually, but right now I'm just going to push that out of my mind and enjoy this life!

Today I have a post that I'm super proud of - I cluttered up my desktop with 60 screenshots for this so I really hope it's helpful, haha!

I'll be showing you how you can use Photoshop to make a super cool little gif like the one above. And if you don't have Photoshop, at the end I've included some useful links for other way to make a gif, so no one gets left out! :) 

Let's get started!

Step 1 / Find a photo that you want to use and open it up in Photoshop. Use ctrl/cmd + o for a shortcut!
Step 2 / To make a gif, we're going to use the timeline window. Go to Window > Timeline
Step 3 / This little panel will appear at the bottom of your screen. Go ahead and click "Create Frame Animation" and your view will change:

Step 4 / Next we'll head on over to the layers panel. It should be at the bottom right of your screen. Right now your photo is set as the background layer, so click on the lock to make it a regular layer.
Step 5 / Create one new layer and one new group. Select your two layers using cmd + click or ctrl + click. Drag them onto the group, then release.
Step 6 / Select the empty layer and draw a design on it.
Step 7 / Close up that group by clicking on the little arrow next to it. Then go ahead and drag that group onto the "new layer" icon to make a copy of it.
Step 8 / Create a new layer in that group and draw a new design on it, using the layer below it as a guide. You'll see how my writing is doubled up in the photo, that's fine! Because...
Step 9 / We're going to delete that layer! "Layer 1" Once you've done that, close up the group and repeat the process. Drag it onto the "new layer" icon to make a copy, then open it up and create a new layer inside it.
Step 10 / Repeat as many times as you like. You can add more layers for more complicated designs, just be careful about which layer you delete! It may not always be the bottommost one. You can always undo if you make a mistake :)

Step 11 / Once you're done, close up all of your folders. Use the ctrl + e or cmd + e shortcut to merge the layers of each group into one. Click on a group, use the shortcut, click on the next group, etc. until you're done.
Step 12 / You're ready to start putting these images together into a gif! Click the icon at the top right of the timeline window, then select "Make Frames From Layers". 


Step 13 / All of your images are now transferred into the timeline as frames. Next, click that menu again, but this time click "Select All Frames".
Step 14 / Head down to your frames and make some adjustments. The first thing you'll want to do is change the timing. Click on the time on one of the frames and change it, then click the play button to test it out. Then click "Once" at the bottom and change the setting to "Forever" so that it repeats over and over. 
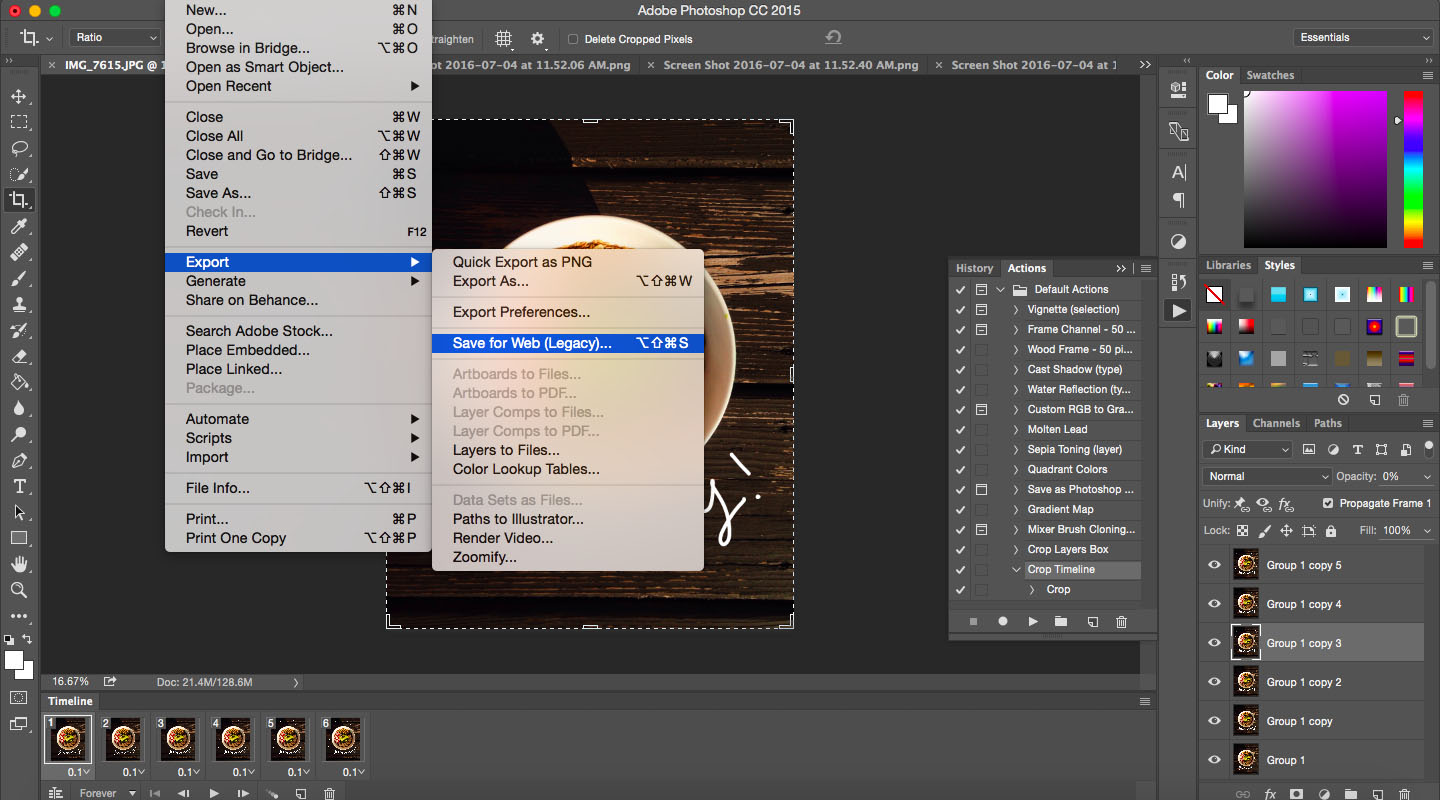
Step 15 / Go to File > Export > Save for Web and change up the settings to suit your liking. I usually change the image size because the photos are so big and I don't need a gif that gigantic. 

Step 16 / Share with all of your friends so that they can see how cool and artsy you are :)

photoshop alternatives

If you don't have Photoshop never fear! If you use Gimp (which is very similar to Photoshop and free!) there is a tutorial that can help you. Or you can also use any program you want and follow the instructions in this post, just save your frames separately and then use this website called gifmaker.me to put them together into a gif! I used this website a ton with my old blog because I didn't have Photoshop and it was super easy to use.

There are so many fun possibilities with gifs! I'd love to see what you make, so send me an e-mail or link to a post :) Have fun!

Also, to finish out this post, I wanted to mention that I recently got a PO box for pen palling! I only have one pen pal right now and I'd love to have more, so if any of you are interested just shoot me an e-mail at hibeanau@gmail.com. Or if you just want to be e-mail blogging buddies I'm looking for those as well, hehe :)

Have a beautiful day everyone!

Beatrice

Wednesday, June 29, 2016

Strawberry Picking // Photo Diary

Hello everyone! Remember my summer bucket list? Recently I got to cross something off - strawberry picking!

To be honest, I was afraid that item would never be accomplished because when I called the farm on a Tuesday they said that the strawberry season might be over. I didn't want to get my hopes up so I sort of just accepted it, and figured we could go blueberry picking in July or something

BUT THEN. I called on Thursday (terrible weather Wednesday) and they said it would be open for one last day! It couldn't have been more perfect. The weather was cool and cloudy, and they said they'd be open in the evening, just before the sunset (perfect for photos!).

So I immediately told everyone in my family and we jumped in the car and went!

Okay no, just kidding, it wasn't that exciting and spontaneous, but that sounds better doesn't it?


Before I leave, I have one last thing for you. But I have to warn you. If you're sensitive to extremely cute fruit, you might want to just leave. Read another post. Here's my post from Father's Day with some nice pictures (shameless plug). Otherwise, you may continue (it's after the forest photo):

It's a dancing strawberry!! "Oh boy, oh boy, I am just so excited to go home with you and be made into some yummy yummy bars!"

Alright, that's all the cuteness you get for now. Thank you so much for reading! Have you ever gone strawberry (or other fruit) picking?

Wednesday, June 22, 2016

Father's Day

Happy father's day to all of the dads out there!

I feel like this holiday hasn't gotten nearly as much attention as it should. I honestly started doubting myself this morning - "What if it's next Sunday? What if they think I'm baking a cake just for the fun of it? But... but two days ago Jimmy Fallon said 'Happy Father's Day'! Was that an old episode...?" I just really thought it'd be mentioned more! To my relief a quick Google search confirmed that I had my dates right. Someone in my family has bought flowers exactly a week early once, so I had reason to worry!

Since cooking has become a new hobby of mine, I've been making cakes for a lot of occasions. For today, I picked this cake that I've had my eye on for a while from The Naked Fig. I LOVE bananas (who doesn't? Okay, some of my friends don't but I'll let that go) and this cake was like 50% bananas so it was perfect. Mine looks a bit different because I used larger cake pans, and I think my coconut sugar must have been darker because my frosting looked brown rather than white, but it tasted great! I thought it was a little bit on the sweet side, but my family disagreed, so I might have just become a little more sensitive to sweetness. I definitely recommend this recipe and the blog!

Ahh... Doesn't that look amazing? I love cakes that look a little bit undone - sauces dripping down the sides, filling oozing out, edges uneven. And that's not just an excuse for my messy cake (the cakes may or may not have fallen apart a bit while I was putting it together, but I persevered!) ;)

As for the card...

A few days ago my little brother brought home a gigantic stack of this grayish-tan paper from school (they send home leftover supplies at the end of the year), so I figured it was about time I started using it. I chose Posca pens because I've been doing everything in those recently - they get absolutely AMAZING vibrant colors.

I only had one shade of brown, and I didn't want to outline everything in black, so I decided to show the boundaries between one area of brown and the next by leaving a little bit of space. I love how it turned out! I added some watercolor to soften out the crispness and brightness of the paint markers.

I reminded my brother of what day it was and he made this adorable card:


He was self-conscious about it, so I had to assure him that it looked fine.
We delivered all of his presents to him and enjoyed the cake. There was a LOT more cake than I thought there would be. When I was making it I was like Oh, wow, this isn't a lot of batter, we can all have a quarter of it! Well, everyone (four people) had some and we haven't even finished half of it!

No matter how much cake there may be though, what I want most is for my dad to know how much we love him. I couldn't live without his patience, guidance, and constant cheerfulness. I'm not going to lie - I got a little bit teary-eyed making the card because I'm the kind of person that will overthink and start crying about how soon I'm leaving for college. But for today, at least, we can forget about that and we can eat cake together.

Beatrice <3